
The Epsilon XRF uses X-ray fluorescence to analyze soil samples. The generated spectra are uploaded to the AgroCares database. XRF scans are then used to determine the micro-nutrient levels in the soil and to increase the overall quality of the analysis.
Startup and Warm-Up
1. Connect the XRF to power and switch on the main power button at the back of the device

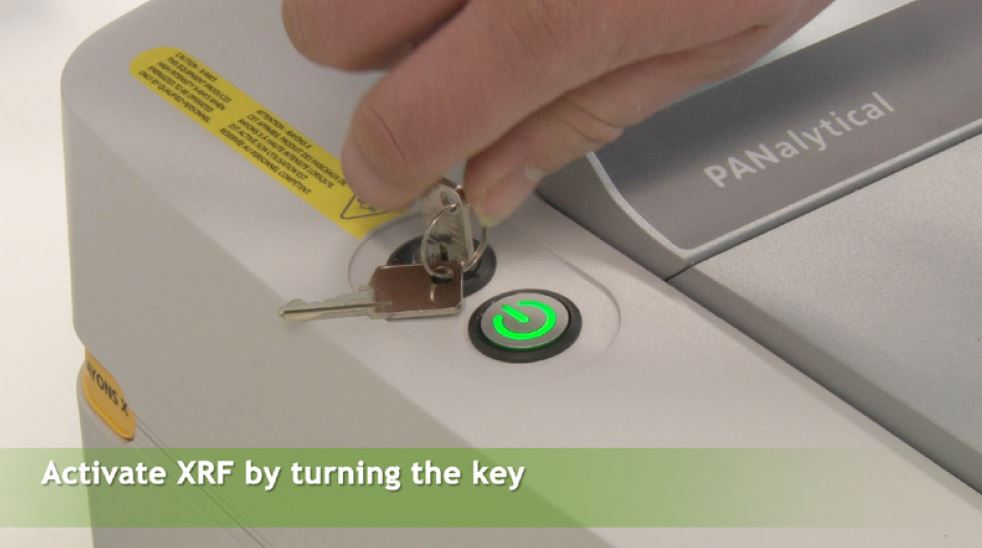
2. Press the ON button and activate the XRF system by turning the HT key
- Key OFF: N/S position
- Key ON: E/W position
3. Allow the XRF to warm up for 60 minutes
- The warm-up starts only when BOTH the ON button is pressed AND the key is turned
- Scanning before warm-up leads to unreliable results
- Performing a Gain Measurement before warm-up may damage calibration and require recalibration by AgroCares!
It is recommended to keep the XRF switched on at all times to preserve performance and extend its lifespan.
Gain Measurement
After warm-up:
1. Open the lid

2. Place the reference sample (metal lid) in a flat position to be measured

3. Close the lid and press OK to start the scan
4. After cycle completion, return the reference sample to the upright position
The system will notify you when a Gain Measurement is required!
System Setup
- Ensure the XRF computer is connected to the internet
- Start the uploader by double-clicking the icon, the uploader needs to be running before you can start scanning soil samples with the XRF.
- Keep the uploader running at all times.
- Ensure that the correct directory paths for the file storage folders are configured
Standard Sample Measurement
- Standard sample A, B and C should be measured at the start of each week, thus weekly.
- Standard sample B should also be measured at the start of each day, thus daily.
1. Place the metal lid in upright position

2. Place the black ring in the center and press “Soil” on the screen

3. Scan the standard sample barcode before placing it inside the ring, then place the sample in the ring


4. Close the lid and press Measure to start analysis

Sample Preparation
In the meantime, prepare your sample.
1. Identify the bottom side of both cups.


2. Place the pre-perforated foil on the plastic cup and press the metal cup on top until it locks.


3. Make sure the surface of the foil is even and smooth

4. Label the sample (write the sample number down on a piece of paper and place the cup on it.)
5. Pour the soil from the tube into the cup until it is half full.

6. Compress the soil by carefully placing the pestle on it and leave it for a few seconds. Do not push the soil with the pestle. (do not apply force)

7. Close the cup with the plastic lid

Sample Analysis
1. When the standard sample is done, remove it from the XRF.
2. Place the fresh prepared sample in the XRF and close the lid.

3. Select “Soil” and scan the sample barcode to be analyzed, press measure to start analysis.

Your scan will be automatically uploaded to the SoilCares system with the uploader is running.
Continuous Workflow
Prepare the next sample while a scan is running. When the scan is finished, remove the sample and pour the soil back into the vial.

Cleaning and Handling
- Avoid touching the measurement surface of the Standard Sample. If the surface is dirtied clean it with a clean wet soft paper towel and dry thoroughly.
- Remove the ring after the last measurement and put the reference sample back in flat position.
Note: Do NOT shut the XRF down unless it is not going to be used for a long time.
When shutting down: Turn the key counter clockwise and press the on/off button.
- The metal outer tube should be cleaned with a paper towel. DO NOT clean it with water or ethanol.

- The plastic sample cups can be used again. Clean them with water and dry them with a paper towel.

If you have any further questions, please reach out to our support team via support@agrocares.com.
Comments
0 comments
Please sign in to leave a comment.